
This article is part of a web development series from Microsoft. Thank you for supporting the partners who make SitePoint possible.
An earlier article explored data within a React component. Data is represented by two structures–properties and state. The former is used to represent immutable data, while the latter represents data that is changed through interactions with the UI or through other external means.
When working with state data, the UI is updated when the state is changed via a call to the setState function. Typically, this function is invoked in response to an event using an event handler.
In this post, we will further explore the updating of state, including form input components and the propagation of state values through the properties of child components. Finally, we will look at the Immutable JavaScript library created by Facebook in order to understand more efficient ways to notify React when a component needs to be re-rendered.
Input Components
Let’s consider the following React Component, which contains a form with one input element, and a change event registered on the input element.
var Message = React.createClass({

  getInitialState: function() {
    return { message: this.props.message };
  },

  _messageChange: function(e) {
    this.setState({ message: e.target.value });
  },

  render: function() {
    return (
      <div>
        <span>Message: {this.state.message}</span>
        <br />
        Message: <input type="text" value={this.state.message} onChange={this._messageChange} />
      </div>
    );
  },

});
When the user enters text into the text input box, a change event handler is executed, capturing the value from the textbox, and then updating the state. For this example, the change event handler is _messageChange. If no onChange event handler is registered, then the field will be read, but the state will not be updated with the input data. In React, input controls do not update themselves, they update the state, and then the state triggers a re-render to update the input control. On the surface this approach seems a little convoluted, but it is the key to the way React always keeps the state of a component in sync with the DOM.
The standard HTML form input controls such as input, select and textarea elements are treated as input components by React. Because these controls can change value, React provides a controlled mechanism by which the controls can be initialized, receive input, and be updated to reflect that input in the UI.
Input components can be either controlled or uncontrolled. Controlled components are managed by React through the value and onChange properties. When the user enters text into the input element, the registered onChange event handler is executed and the text entered is passed as an argument via an events object. The text argument is used to update the state which is then passed back into the controlled component via props. A form component with the value property set but no onChange property, will be read only as mentioned earlier.
So why is the input component read only? As described earlier, with controlled input components, the input control itself is not directly updated by interacting with it. Instead of being directly updated, the change event is fired. To capture the new value, this event must be handled, and the passed event object is used to access the new value. Then, the new value is used to update the state of the input component’s parent component. In the example above, this parent component is Message. Calling the parent’s setState function re-renders the input component, and the updated state value is passed back into the input component via its props. Why this approach? The view (in this case, the DOM) and the state of the React component must always be the same, which is not possible using traditional uncontrolled input elements.
Consider the following non-React code.
<main>
  <input name="message" value="Hello World!">
  <button>Get Value!</button>
</main>
When the user enters text into the input control, the input control will display the text that was entered. After the user enters text into the input control, and the button is clicked, what do you think the output is?
document.getElementsByTagName("button")[0].addEventListener("click", function() {

  console.log(document.querySelector("[name='message']").getAttribute("value"));

});
Interestingly, the output is NOT the updated text typed into the box, but rather, the original value of the attribute when the input control was rendered. While the updated text is displayed, the DOM is now out of sync with the state of the input control.
To see this action, try out the following CodePen.
See the Pen React.js Uncontrolled Input Demo by SitePoint (@SitePoint) on CodePen.
For many JavaScript libraries and frameworks, this is not an issue. However, for React, its Virtual DOM and component state should always be synchronized.
Consider the following CodePen demonstration.
See the Pen React.js Controlled / Uncontrolled Input Demo by SitePoint (@SitePoint) on CodePen.
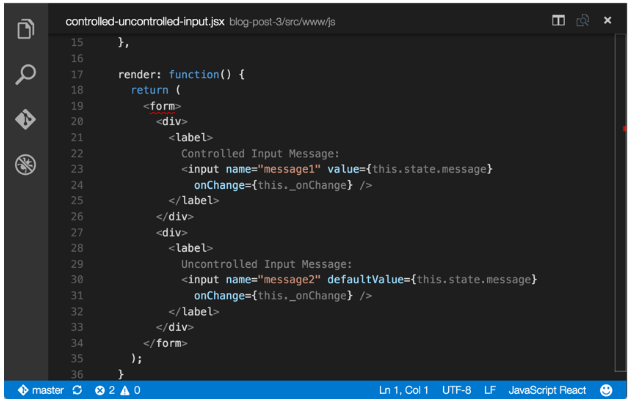
Enter text into the first input box, and observe how only the first input box updates. Enter text into the second input box, and observe how both input boxes update. Because the second input box does not bind to the value property, when the message updates, that update is not reflected in the second input box. Because the second input box handles the change event through the onChange property, the state is updated, where the changed message value is updated in the first input box, then displayed on the screen. The defaultValue property of the second input box is only used when the input component is rendered the first time.
An input component is uncontrolled if it does not have its value property set, and updates in the UI normally when interacting with the component, but no re-rendering will occur as a result of state changes.
To explore additional form input component functionality, consider the Color List demonstration described in the next two sections.
Propagation of State through Child Components
Developers who are new to React often wonder whether data is stored in the props or the state. As mentioned in earlier posts, the props are an immutable structure and they are the preferred way to pass data into components. State is a mutable structure which triggers the component to re-render when it changes. The answer to the earlier question–whether data is stored in the props or the state – is both. Choosing props or state has less to do with what the data is, and more to do with the relationship of the data to the overall component structure. Data passed in as props could then be used to initialize state. State data is then passed in as props to a child component. The determination of whether to use props or state primarily centers on the relationship of the data to the component, as well as the relationship of the component to other components.
Composing components is a common pattern in React. In the code example below, there are three components: Color, ColorList, and ColorForm. Color is the parent or container component for ColorList and ColorForm. As the parent component, Color is responsible for maintaining the state and triggering the re-rendering of its child components.
Parent Color Component
getInitialState: function() {
  return {
    colors: new Immutable.List(this.props.colors)
  };
},

render: function() {
  return (
    <ColorList colors={this.state.colors} /> <ColorForm addColor={this._addColor} />
  );
}
To propagate the values of the state from the parent component to the child, the state values are passed into the child component via props as shown in the parent’s render function.
The child accesses the passed-in props through the props property on the component, as shown below.
Child Color List Component
render: function() {
  return (
    <ul>
      {this.props.colors.map(function(color) {
        return <li key={color}>{color}</li>;
      })}
    </ul>
  );
}
Observe the data flow–the parent component receives data via its props. Those props are used to initialize the state of the parent, then the parent passes the state data to its children via their props. The children then use the props to render themselves.
So the same data is viewed both as immutable props and mutable state, depending upon the purpose of the component receiving the data. The reason the parent component handles the data as mutable state is that it can handle events from a child component which passes up new data, triggering the state to change, then passes the updated state to all of the child components. The child component is not responsible for updating anything with the new data, it simply passes that data along to its parent component which performs the update. This results in an easy to understand and predictable data flow.
Child Color Form Component
_onClick: function(e) {
  // calls the _addColor function on the parent to notify it of a new color
  this.props.addColor(this.state.newColor);

  // the input component is a child component of this form component
  // so this component maintains state for its own form, and also passes
  // along new data to it’s parent so the parent can maintain state for
  // the whole component
  //
  // because the form is self-contained in this component, the state for
  // form is maintained here, not the parent component
  this.setState({ newColor: undefined });
},

render: function() {
  return (
    <form>
      <label>
        New Color
        <input type="text" name="newColor"
          value={this.state.newColor} onChange={this._onChange} />
      	<button type="button" onClick={this._onClick}>Add Color</button>
      </label>
    </form>
  );
}
In the above code sample, clicking the button invokes a handler function that is passed into the child Color Form component via props from the parent Color component. This function then triggers the parent component to add the new color to the state, and triggers a re-render via the setState function.
Parent Color Component
_addColor: function(newColor) {
  this.state.colors.push(newColor);
  this.setState({
    colors: this.state.colors
  });
},
When one component updates, it notifies the parent, who then notifies all of the children. State is maintained in one component, and all of the other components simply display immutable props which are set from the state.
To view the entire Color List code demonstration, check out the CodePen below.
See the Pen React.js Propagation Demo by SitePoint (@SitePoint) on CodePen.
Immutability
While props are technically mutable (i.e., JavaScript does not prevent a component from changing them), altering them would be a violation of a fundamental principle of React, and therefore one should consider props to be immutable.
On the other hand, state is often mutated. However, the principle of immutability may be leveraged with state to further improve the performance of a React component.
An essential aspect to mutating state is determining what changed, then updating the Virtual DOM based upon those changes. Determining the change of certain mutations is easy. A change to a number or string value in the state is easy to determine by simply comparing the old and new value. Even creating a new object and setting the new reference on the state is easy to determine. But what about an array? How can a program determine whether an array has changed? When new items are added to an array, the reference to the array does not change. Checking the length of the array might reveal a change, but what if one item is added and one item is removed? How would our program determine whether the array changed without iterating over each item and comparing it against the original array? Compared to checking for a changed single value, this is a difficult problem to solve.
The solution to this problem is immutability. Facebook created a JavaScript library called Immutable, which provides structures to facilitate the creation and management of Immutable objects within JavaScript.
var colors = [“red”, “blue”, “green”];

var listOfColors = new Immutable.List(colors);

var newListOfColors = listOfColors.push(“orange”);

// outputs false
console.log(listOfColors === newListOfColors);
In the code example above, a new list of colors is generated when “orange” is pushed onto the list. The original list with an extra color added is NOT returned from push(). Instead, a completely new object with a new reference is returned. This means that the new object reference can easily be used to determine whether the list has changed. Using an immutable structure allows a React component to avoid performing an item by item comparison of a list–instead, a simple reference check on the array is all that is required.
React invokes the shouldComponentUpdate function on each component to determine whether it or its child components should re-render themselves in response to a state change. The default implementation of this function simply returns true. Essentially, the component and its children will re-render every time without regard to what did or did not change. To avoid re-rendering when not needed, a component can shadow the default function with a new function which examines the state or props (props populated by the new state data) data for changes. To leverage this efficient checking, a custom shouldComponentUpdate function can be added to the component’s definition (shadowing the original function on the component prototype), and a simple one-line reference comparison check can be added.
Examine the Color List code demonstration from the previous section, which is expanded below.
Parent Color Component
getInitialState: function() {
  return {
    colors: new Immutable.List(this.props.colors)
  };
},

_addColor: function(newColor) {
  this.setState({
    colors = this.state.colors.push(newColor)
  });
},

render: function() {
  return (
    <div>
      <ColorList colors={this.state.colors} />
      <ColorForm addColor={this._addColor} />
    </div>
  );
}
Child Color List Component
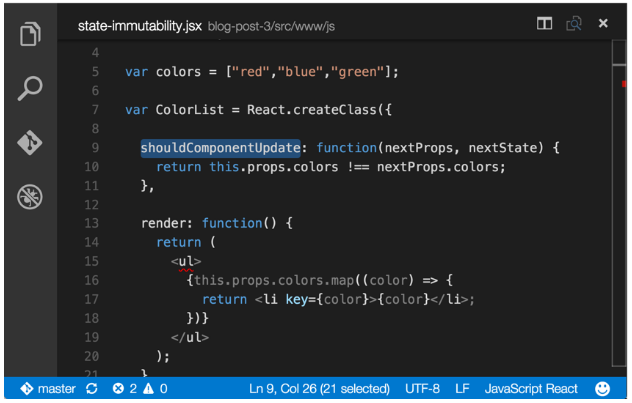
shouldComponentUpdate: function(nextProps, nextState) {
return nextProps.colors !== this.props.colors;
}
The function _addColor in the parent component executes as a result of an event on another child component (not shown here, but in the CodePen). The new color data from the event is passed into the _addColor function and added to the list of colors. When the color is added, a new list object is created and returned from the push function provided by the Immutable library. When the parent component is re-rendered, the shouldComponentUpdate function of the child Color List component is invoked, and it compares the reference from the original color list to the reference to the new color list (to understand how the new color list is passed from the parent to the child component, please the previous section). Because the Immutability library produces a new object, all that is needed is a simple reference comparison to determine whether the list was changed. Therefore, the list will only be updated if the list changes, not on every re-render triggered by the parent component.
To the entire example in action, checkout the CodePen below.
See the Pen React.js Immutability Demo by SitePoint (@SitePoint) on CodePen.
Demo Application
A working React web application which demonstrates many of the concepts from this and earlier posts is available at https://github.com/DevelopIntelligenceBoulder/react-flux-app. The application has been deployed to Azure, and is accessible at the following URL: http://react-widgets.azurewebsites.net.

The web application demonstrates the creation of components, composing components, proper use of props and state, as well as extensive use of events. The JavaScript is written in ES2015 and JSX, using Babel to transpile to ES5, as well as WebPack to produce a single JavaScript file including all of the coding libraries such as React, ReactDOM, Immutable, etc. installed with NPM. Gulp has been used to automate various development tasks. Fork the project today to being exploring the many innovative and useful aspects of programming with React.
To run the project Node.js needs to be installed. Also, SASS is being used as a CSS preprocessor, so Ruby with the SASS gem need to be installed. For full setup instructions click here.
Conclusion
Working with data in React is a different way of thinking. The process of data flowing from a child component to a parent’s component state, then propagating that state via props back down through all of the child components and re-rendering the DOM based upon what changed, is efficient and effective. The approach can be a little daunting at first, especially for a developer is used to server-side development or the creation of web applications with technologies such as jQuery or Angular.js. Nevertheless, once the flow of data from input to state to props to render is correctly understood, we can see it’s a powerful paradigm for keeping the DOM and components synchronized.
This article is part of the web development series from Microsoft tech evangelists and DevelopIntelligence on practical JavaScript learning, open source projects, and interoperability best practices including Microsoft Edge browser and the new EdgeHTML rendering engine. DevelopIntelligence offers JavaScript Training and React Training Courses through appendTo, their front-end focused blog and course site.
We encourage you to test across browsers and devices including Microsoft Edge – the default browser for Windows 10 – with free tools on dev.microsoftedge.com, including F12 developer tools — seven distinct, fully-documented tools to help you debug, test, and speed up your webpages. Also, visit the Edge blog to stay updated and informed from Microsoft developers and experts.